
Creating a test environment
1. Introduction
A dedicated test environment makes it easy to study Decred components and to create new applications.
The virtual machine completely separates the test environment from the production environment, but it is perfectly possible to follow only some of the suggestions, creating the users and installing the applications locally, in case of installing a full node in the local network or a block explorer running dcrdata.
Prerequisite
- Oracle Virtualbox at https://www.virtualbox.org/
- Debian Linux 9 image, first DVD at https://www.debian.org/CD/
- dcrinstall and Decrediton at https://github.com/decred/decred-binaries/releases/
- Golang (optional) at https://golang.org/dl/
2. Installation
Users running Debian or Ubuntu as host operating system can install Virtualbox by running:
$ sudo apt-get install virtualbox
For other installation packages, check SHA256 hash available on the Downloads page.
Install Oracle Virtualbox as you would normally do and create the virtual machine. The recommended configuration would include 2 processors, 2GB RAM, 1 network card, 1 DVD drive. Disk space depends on what will be installed. Read next.
2.1. Partitioning
It is recommended to install system components in separate partitions and disks for better management of disk space. Directories /boot, /, /home, and /root are always required and should be located on the primary disk. This partitioning scheme makes it easier to update the system and prevent the depletion of disk space required by the system because of files saved in /home or /root.
A separate virtual disk for the blockchain makes management easier. In the next example, the second disk was mounted on /opt/blockchain. To store both Mainnet and Testnet blockchains, reserve at least 7GB. To install dcrdata it is necessary to reserve a disk of size at least 25GB for PostgreSQL database, which in the next example was mounted on /opt/pgsql. You may need to add other disks if other components will be installed on the same server.
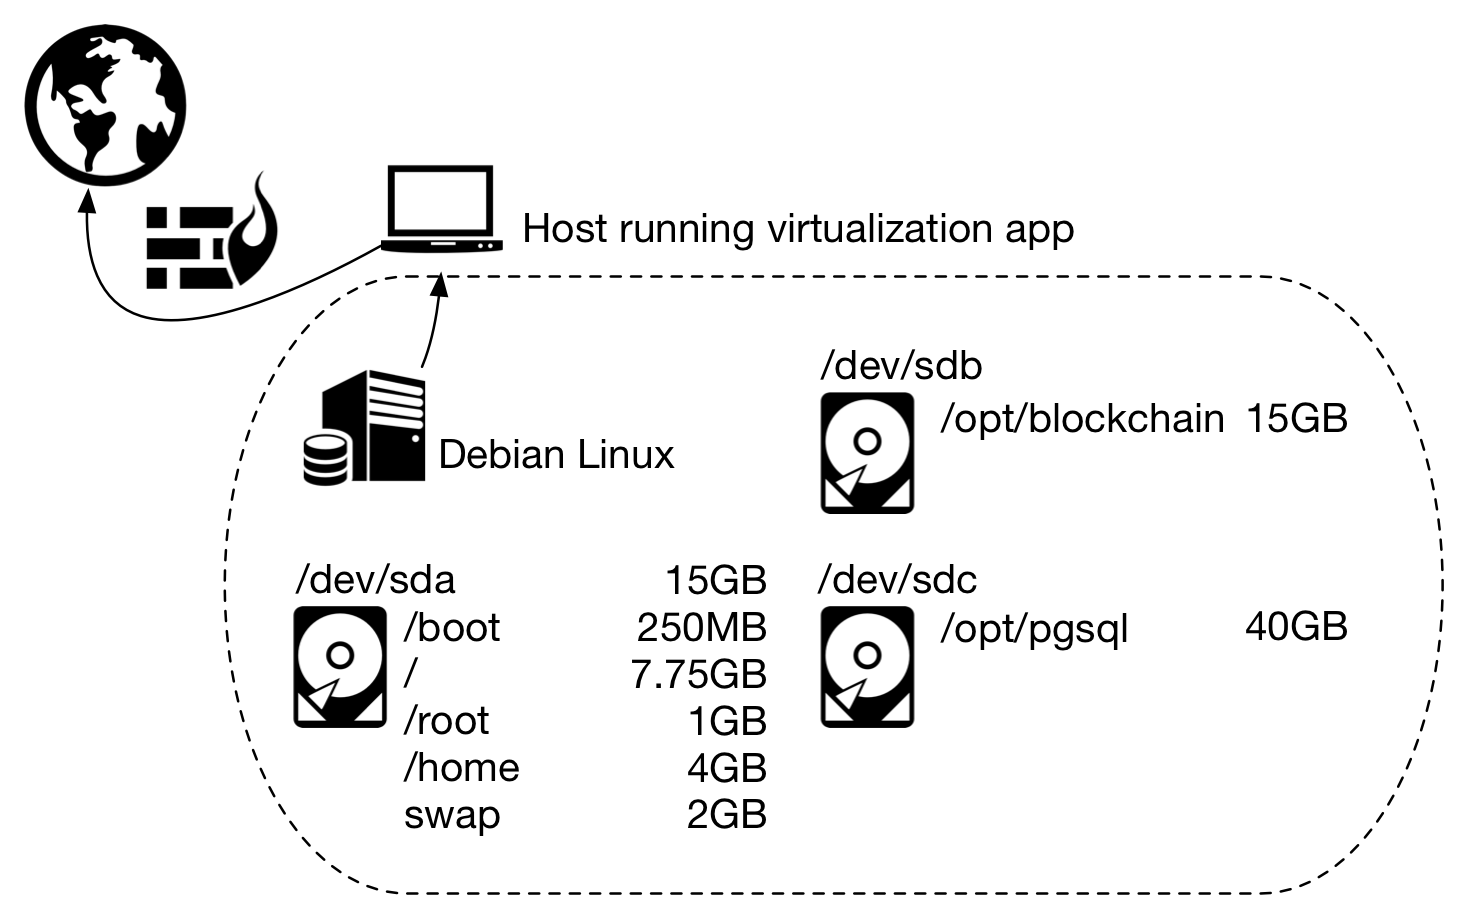
Figure 1 - Suggested partitioning scheme
2.2. Installation and update
Before installing Debian Linux, verify its digital signature. Learn more at Verifying Digital Signatures: Debian Linux.
Perform the default installation of Debian Linux. Firewall rules can be configured as shown in the example from the article The Decred structure.
Install sudo (Super User do) and add your user (created during the installation) to the sudo group (group of users that can execute the sudo command). From then on, use sudo to run commands that require root privileges.
$ su -
# apt-get install sudo
# usermod -aG sudo $USERNAME
To check if your user is member of the sudo group:
# groups $USERNAME
If you logged on with your non-administrative user (instead of the root user), you will need to log off and log back on to update user group information. After logging on, update the operating system:
$ sudo apt-get update && apt-get upgrade
3. User creation
Starting on Decrediton 1.2.1 it is now possible to manage more than one wallet per user, choosing the desired wallet when Decrediton starts. To make it easier to understand the scenarios and closer to real life, different users will be kept in this material.
Create one user for each character in the scenario you want to test. Each user will have their own wallet, so it is possible to reuse users and wallets in other tests and run them in parallel.
$ sudo adduser alice
$ sudo adduser bob
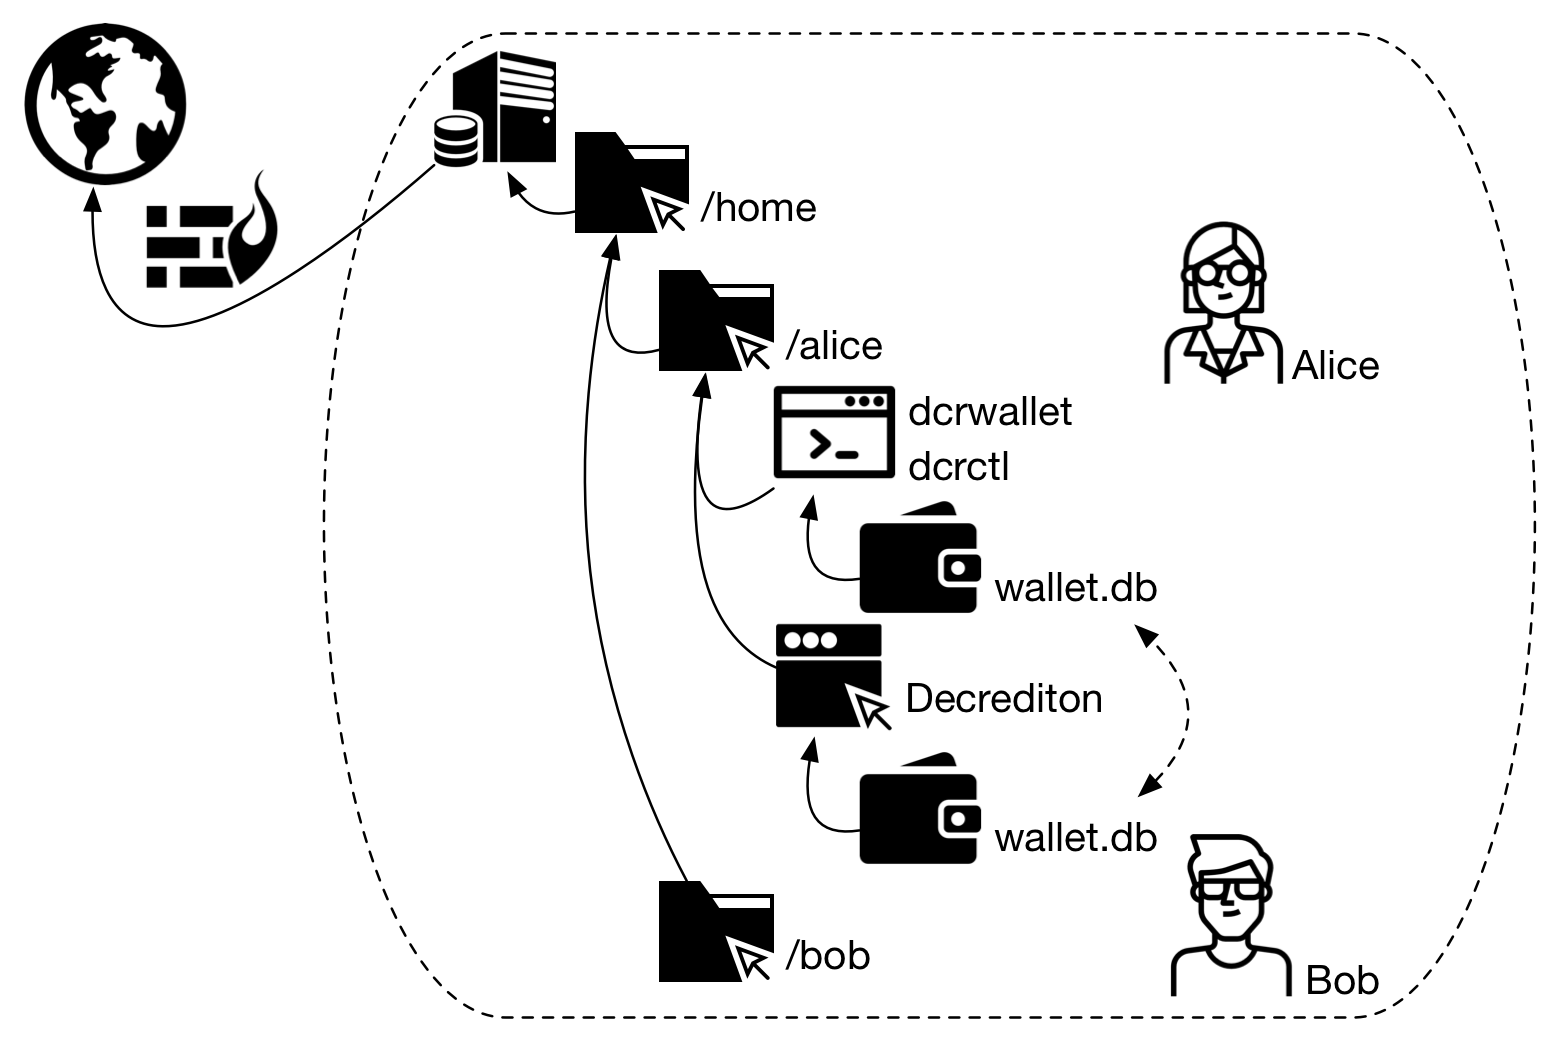
Figure 2 - Suggested directory structure
4. Components
Download packages decred-linux and Decrediton at https://github.com/decred/decred-binaries/releases/ and make them locally available in a directory accessible by all test users:
$ mv decred-linux-$ARCH-$VERSION.tar.gz decrediton-$VERSION.tar.gz /opt
Before unpacking decred-linux or Decrediton, verify their digital signatures. Learn more about Decrediton on Decrediton Setup.
4.1. dcrd
While logged with your own user, extract Decred to /opt:
$ sudo tar -C /opt -xvf decred-linux-$ARCH-$VERSION.tar.gz
Make a copy of the sample-dcrd.conf file to dcrd.conf. Configure RPC user and password in the dcrd.conf file. To run dcrd in Testnet:
$ cd /opt/decred-linux-$ARCH-$VERSION
$ ./dcrd --testnet -C dcrd.conf -b /opt/blockchain
To learn more, read Installing dcrd.
Minimize the terminal window.
4.2. dcrwallet and Decrediton
Log on with one of the test users (Alice, Bob, etc.) and extract the packages.
$ su - alice

$ tar -C $HOME -xvf decred-linux-$ARCH-$VERSION.tar.gz
$ tar -C $HOME -xvf decrediton-$VERSION.tar.gz
Enter the newly created directory and run dcrwallet to create a new wallet:
$ cd $HOME/decred-linux-$ARCH-$VERSION
$ ./dcrwallet --testnet create
Make a copy of the sample-dcrwallet.conf file to dcrwallet.conf. Configure the same RPC user and password from dcrd.conf file in dcrwallet.conf file.
To run one dcrwallet per user at the same time, you will need to specify different TCP ports for each dcrctl connection. After running dcrwallet, minimize the terminal.
alice@testnet$ ./dcrwallet --testnet --rpclisten=127.0.0.1:9211
alice@testnet$ ./dcrctl --testnet -s 127.0.0.1:9211 --wallet getbalance
On another terminal, run dcrctl. Notice the change in TCP port.
bob@testnet$ ./dcrwallet --testnet --rpclisten=127.0.0.1:9212
bob@testnet$ ./dcrctl --testnet -s 127.0.0.1:9212 --wallet getbalance
To use the same wallet in dcrwallet and Decrediton, you will need to make a copy of the wallet file from one folder to another before each use.
alice@testnet$ cp ~/.dcrwallet/testnet2/wallet.db ~/.config/decrediton/testnet2/
Running more than one Decrediton simultaneously is a bit more complicated because you need to configure Decrediton to use the local dcrd and also because of how dcrwallet will be used. The shared use of dcrd and dcrwallet will be dealt with in other articles.
5. Installing Go (golang)
To make changes in Decred components or create new components using the same language, see Installing Go (golang).