
Installing dcrd
1. Introduction
dcrd is a full node implementation of a Decred network blockchain server written in Go. This daemon maintains a copy of the ledger and transmits the transactions to other nodes in the world. To see how dcrd fits into the Decred ecosystem, read The Decred structure.
There is more information on dcrd available in the README on Github and in the official documentation of the command line.
This installation is not necessary for those who only want to use Decrediton, because Decrediton has its own internal dcrd.
1.1. Advantages
The configuration as Client-Server allows other dcrd servers to connect to this dcrd to update blocks and mempool transactions. This makes Decred network more robust and therefore is the recommended configuration.
1.2. Architecture
You can run dcrd on an isolated host, a full node blockchain server on a Raspberry Pi, for example. You can also specify the partition (or disk) where the blockchain will be copied to and where the log files will be generated.
Decrediton, which has an internal dcrd, can also be configured to use a local network dcrd (as in the next figure). The configuration of Decrediton, dcrwallet and dcrctl will be explained in other articles.
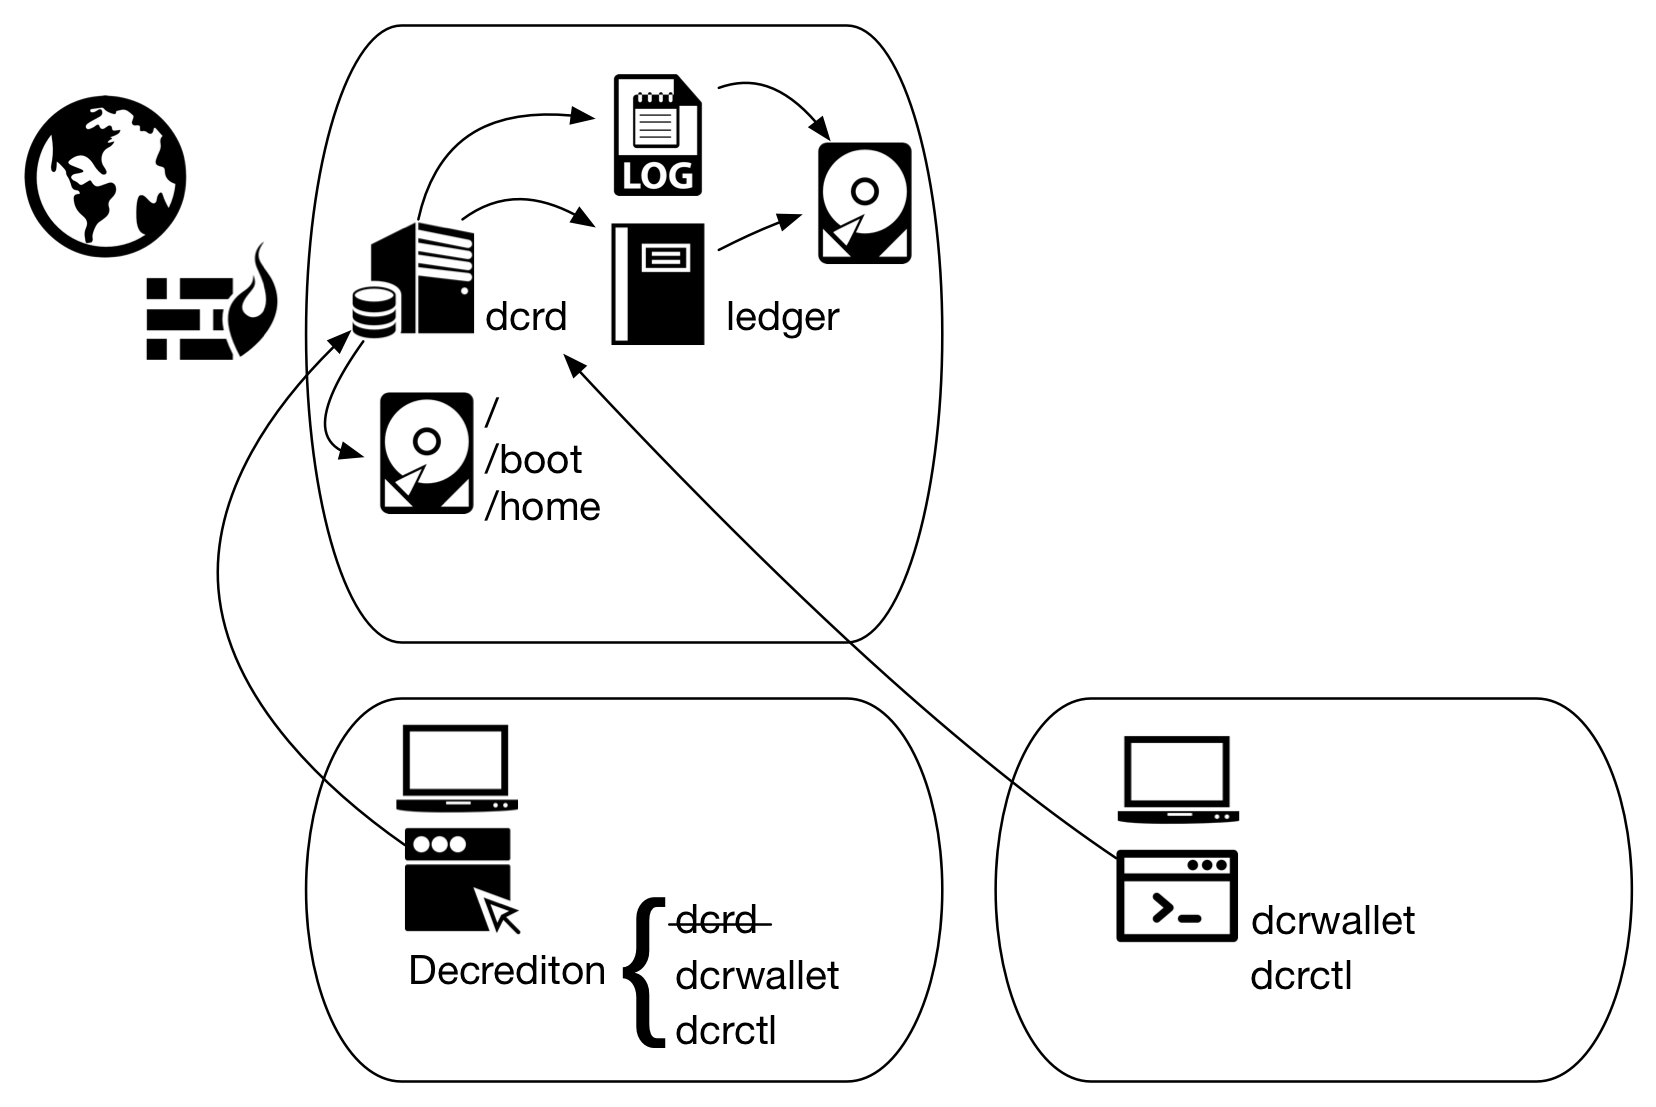
Figure 1 - dcrd execution on an isolated host
2. Installation
dcrd can be installed in 3 different ways:
- via dcrinstall: executable created by the developers to download the compiled executable files (dcrd, dcrwallet and dcrctl), verify the digital signatures, create the configuration files and guide the user through the wallet creation process;
- manual installation: the user downloads the compiled executables (dcrd, dcrwallet and dcrctl), verifies the signatures, extract them, decides on the solution architecture, creates the configuration files and executes the components;
- clone of the source code: useful for those who want to learn how the internal mechanisms work or make modifications to the project; the user locally clones the dcrd source code directory, compiles and executes it.
The easiest way is the installation via dcrinstall.
2.1. Automatic installation via dcrinstall
The following steps were performed on a Debian 9 64-bit and on a macOS 10.13.
a) Go to https://github.com/decred/decred-release/releases/
b) On Debian: download to the same directory the files dcrinstall-linux-$ARCH-$VERSION.tar.gz, manifest-dcrinstall-$VERSION.txt and manifest-dcrinstall-$VERSION.txt.asc
On Mac: download to the same directory the files dcrinstall-darwin-$VERSION.tar.gz, manifest-dcrinstall-$VERSION.txt and manifest-dcrinstall-$VERSION.txt.asc
$ARCH may be, among other options, ‘amd64’, ‘386’, ‘arm’ or ‘arm64’.
| Architecture | Filename |
|---|---|
| Windows 32-bit | dcrinstall-windows-386-[$VERSION].zip |
| Windows 64-bit | dcrinstall-windows-amd64-[$VERSION].zip |
| Linux 32-bit | dcrinstall-linux-386-[$VERSION].tar.gz |
| Linux 64-bit | dcrinstall-linux-amd64-[$VERSION].tar.gz |
| Linux 32-bit ARM (e.g. Raspberry Pi) | dcrinstall-linux-arm-[$VERSION].tar.gz |
| Linux 64-bit ARM (e.g. Raspberry Pi) | dcrinstall-linux-arm64-[$VERSION].tar.gz |
| macOS 64-bit | dcrinstall-darwin-amd64-[$VERSION].tar.gz |
| Hash file | manifest-dcrinstall-[$VERSION].txt |
| Signature of hash file | manifest-dcrinstall-[$VERSION].txt.asc |
c) In case the key hasn’t already been imported (error: ‘gpg: Can’t check signature: No public key’): import the developer’s public key (GPG will try to connect to the Internet using port TCP/11371):
$ gpg --keyserver pgp.mit.edu --recv-keys 0x518A031D
In case of error ‘gpg: keyserver receive failed: No dirmngr’:
$ sudo apt-get install dirmngr
d) Make sure the correct key was imported:
gpg: key 6DF634AA7608AF04: "Decred Release <release@decred.org>" imported
e) Verify the digital signature:
$ gpg --verify manifest-dcrinstall-$VERSION.txt.asc
f) Look in the gpg output for: “using RSA key 6D897EDF518A031D” (only when verifying for the first time after importing the key). Notice that the second half of the RSA key, shown in the third line above, is shown in step c) and also the text ‘Good signature from “Decred Release”’
g) To avoid dcrd being executed with root privileges, create a user to run dcrd:
$ sudo adduser -m dcrduser
$ sudo cp dcrinstall-$ARCH-$VERSION /home/dcrduser
$ sudo su - dcrduser
h) Add the execution attribute to the file and then execute it:
$ chmod u+x dcrinstall-$ARCH-$VERSION
$ ./dcrinstall-$ARCH-$VERSION
When the installation process finishes, if a wallet was not previously generated for this user, dcrinstall will start creating one. Press [Ctrl+C] to cancel the creation of a new wallet when the terminal shows the output:
creating wallet: mainnet Enter the private passphrase for your new wallet:
Decred binaries will have been copied to /home/dcrduser/decred-$ARCH-$VERSION directory. For future references, the binaries can be moved to /opt directory and a symbolic link to /opt/decred/ can be created:
$ sudo mv ~/decred-$ARCH-$VERSION /opt
$ sudo ln -s ~/decred-$ARCH-$VERSION ~/decred/
To execute dcrd using a specific configuration file the -C option must be used:
$ sudo -u dcrduser /opt/decred/dcrd -C dcrd.conf
Read about how to run dcrd as a Linux service.
Skip sections 2.2 and 2.3.
2.2. Manual installation (binaries)
The following steps were performed on a Debian 9 64-bit.
Installing via binaries suits most users, those who just want to use dcrd. The installation via source files in section 2.3 is meant for those who want to develop in Golang by changing the source code. To install only the dcrd, dcrwallet, and dcrctl binaries, without having to install Go, clone repositories and so on:
a) Go to https://github.com/decred/decred-binaries/releases/
b) On Debian: download to the same directory the files decred-linux-$ARCH-$VERSION.tar.gz, manifest-$VERSION.txt and manifest-$VERSION.txt.asc
On Mac: download to the same directory the files decred-darwin-$ARCH-$VERSION.tar.gz, manifest-$VERSION.txt and manifest-$VERSION.txt.asc
$ARCH may be, among other options, ‘amd64’, ‘386’, ‘arm’ or ‘arm64’.
| Architecture | Filename |
|---|---|
| Windows 32-bit | decred-windows-386-[$VERSION].zip |
| Windows 64-bit | decred-windows-amd64-[$VERSION].zip |
| Linux 32-bit | decred-linux-386-[$VERSION].tar.gz |
| Linux 64-bit | decred-linux-amd64-[$VERSION].tar.gz |
| Linux 32-bit ARM (e.g. Raspberry Pi) | decred-linux-arm-[$VERSION].tar.gz |
| Linux 64-bit ARM (e.g. Raspberry Pi) | decred-linux-arm64-[$VERSION].tar.gz |
| macOS 64-bit | decred-darwin-amd64-[$VERSION].tar.gz |
| Hash file | manifest-[$VERSION].txt |
| Signature of hash file | manifest-[$VERSION].txt.asc |
c) In case the key hasn’t already been imported (error: ‘gpg: Can’t check signature: No public key’): import the developer’s public key (GPG will try to connect to the Internet using port TCP/11371):
$ gpg --keyserver pgp.mit.edu --recv-keys 0x518A031D
In case of error ‘gpg: keyserver receive failed: No dirmngr’:
$ sudo apt-get install dirmngr
d) Make sure the correct key was imported:
gpg: key 6DF634AA7608AF04: "Decred Release <release@decred.org>" imported
e) Verify the digital signature:
$ gpg --verify manifest-$VERSION.txt.asc
f) Look in the gpg output for: “using RSA key 6D897EDF518A031D” (only when verifying for the first time after importing the key). Notice that the second half of the RSA key, shown in the third line above, is shown in step c) and also the text ‘Good signature from “Decred Release”’
g) To avoid dcrd being executed with root privileges, create a user to run dcrd:
$ sudo adduser dcrduser
$ sudo cp decred-[linux|darwin]-$ARCH-$VERSION /opt
h) Extract it:
$ sudo tar -xzf decred-[linux|darwin]-$ARCH-$VERSION.tar.gz
Decred binaries will have been extracted to /home/dcrduser/decred-$ARCH-$VERSION directory. For future references, a symbolic link can be created:
$ sudo ln -s /opt/decred-$ARCH-$VERSION /opt/decred/
To use this configuration file you will need to start dcrd with the -C option:
$ sudo -u dcrduser /opt/decred/dcrd -C dcrd.conf
Read about how to run dcrd as a Linux service.
Skip section 2.3.
2.3. Manual installation (source clone)
Prerequisite
Go version 1.7 must be installed. To install, read the article Installing Go (golang).
The following steps were performed on a Debian 9 64-bit.
a) Clone dcrd repository:
$ git clone https://github.com/decred/dcrd $HOME/go/src/github.com/decred/dcrd
If you do not have git installed:
$ sudo apt-get install git
b) Enter the directory you just created, run Dep to check the dependencies and compile.
$ cd $HOME/go/src/github.com/decred/dcrd

$ dep ensure
$ go build
or
$ /usr/local/bin/go/bin/dep ensure
$ /usr/local/bin/go/bin/go build
c) If no error occurred, a dcrd file with executable attribute must have been created. Try to visualize dcrd help message:
$ ./dcrd --help
d) For a permanent installation, install dcrd through Go:
$ go install . ./cmd/...
e) To avoid dcrd being executed with root privileges, create a user to run dcrd:
$ sudo adduser dcrduser
f) Copy dcrd executable copliled in step b) to directory /home/dcrduser:
$ mkdir decred
$ sudo cp ~/go/src/github.com/decred/dcrd/dcrd /home/dcrduser/decred/
$ sudo chown -R dcrduser /home/dcrduser/decred/
$ sudo su - dcrduser
g) Execute it:
$ dcrd [--testnet]
3. Configuration
3.1. Decred on Tor network
For those who want to use dcrd in the Tor network: before running dcrd for the first time and configure it according to your environment. Because the configuration files have not been generated, block all outgoing network traffic on tcp/9108 (mainnet) or tcp/19108 (testnet) ports and proceed with step 3.2 to generate the configuration file. Then configure dcrd to go through Tor proxy.
3.1.1. Blocking outgoing dcrd traffic
$ sudo iptables -A OUTPUT -p tcp -m multiport --dports 9108,19108 -m comment --comment "dcrd to dcrd mainnet/testnet" -j DROP
Follow the step in section 3.2 to generate the configuration files and proceed to the next section (3.1.2).
3.1.2. Unblocking outgoing dcrd traffic
To unblock the network traffic you must delete the rule created in the previous section.
$ sudo iptables -D OUTPUT -p tcp -m multiport --dports 9108,19108 -m comment --comment "dcrd to dcrd mainnet/testnet" -j DROP
3.2. Generating config files
If you perform the manual installation according to sections 2.2 or 2.3, it is likely that when the installation process finishes there is no dcrd.conf file. Running dcrd without any parameters creates a default configuration file. Run and in the next second or two stop the execution with [Ctrl+C].
$ ./dcrd [-C /path/to/dcrd.conf] [--testnet]
There should be now a $HOME/.dcrd directory. The next section shows some parameters that can be informed when running dcrd or permanently configured in dcrd.conf file.
3.3. Configuration

Figure 2 - Using several disks to avoid performance compromise
3.3.1. Blockchain (data) and log file
Because the blockchain requires a lot of disk space (in the order of GBs), you can specify another directory or other directory on another partition or another disk to store the blockchain. It is common in servers that need good performance to separate the log files on another disk, and the operating system to remain isolated to prevent the usage of all available disk space from interrupting system operation. The default is $HOME/.dcrd/data.
Parameters for command line execution: --datadir=, --logdir=. To configure dcrd.conf: datadir=, logdir=.
3.3.2. TCP ports
Read the article The Decred structure to know which TCP ports are required for the communication of dcrd with other Decred network components and with the outside world.
3.4. File permissions
Configure directory owner as the user who will run dcrd.
$ sudo chown $DCRD_DATAFOLDER $DCRD_USER
Configure folder permissions so that only $DCRD_USER (the owner) has write access.
$ sudo chmod 755 $DCRD_DATAFOLDER
4. Execution
Having all parameters configured, execute dcrd again. Blockchain download should take more than two hours and the files will be copied to the directory specified in the parameter datadir in dcrd.conf or to $HOME/.dcrd/data.
$ ./dcrd [-C /path/to/dcrd.conf] [--testnet]