dcrdata: running your own block explorer
1. Introduction
dcrdata provides a web interface to analyse the content of blocks, transactions and wallet addresses, along with tickets and votes. To check it out, go to https://dcrdata.decred.org/.
Before starting the installation, do your planning: see section 3 for hardware and software prerequisites.
1.1. Motivation
It is common, after making a transaction, to place the txid (transaction hash) in a block explorer to see if the transaction has already been propagated and its number of confirmations. Often, when carrying out a p2p transaction, the party responsible for sending the coins sends a link from a block explorer pointing to the txid. Here begins the problems of our hero.
Privacy
When opening this link the user is connecting to a web server, which will register the IP address and many other information disclosed by the browser.
Although you can use a VPN to mask your origin, you would need to make sure that the VPN service does not store your IP address and the destinations accessed and DNS queries performed (no log policy). The website PrivacyTools has a list of VPN providers located outside the US, with no log policy (although there is no guarantee), which accept Bitcoin and support OpenVPN. Pick providers located in countries outside the Fourteen Eyes group.
Malicious code
In addition to having their information and even their location exposed, the user is also exposed to the execution of malicious code, mainly via Javascript.
Forged transactions
If the counterparty in the transaction has control over the block explorer, it can forge a transaction that appears to exist on the blockchain but exists only in that database/web application. One scenario is when one party expects the other to confirm the shipment to proceed with the deal.
Conclusion
By running his own full node, with his own block explorer, the user is not exposed to these threats every time he checks a transaction.
1.2. Differences between nodes
There are differences between nodes mempools, but all transactions will be propagated to all nodes, even if it takes a little longer to reach yours.
Your node’s mempool will probably not be the same as the mempool of other nodes. Transactions are propagated between nodes that are directly connected, and so on. In addition, the mempool is reset every time the dcrd is turned off. So it is normal that, after restarting dcrd, your mempool will not have the transactions other nodes have.
2. Architecture
Scenario 1: dcrd, dcrdata, PostgreSQL and the web client on the same server.
Scenario 2: dcrd, dcrdata and PostgreSQL on the same server. Web client performs remote access.
Scenario 3: dcrd in one server, dcrdata and PostgreSQL in another. Web client perform remote access.
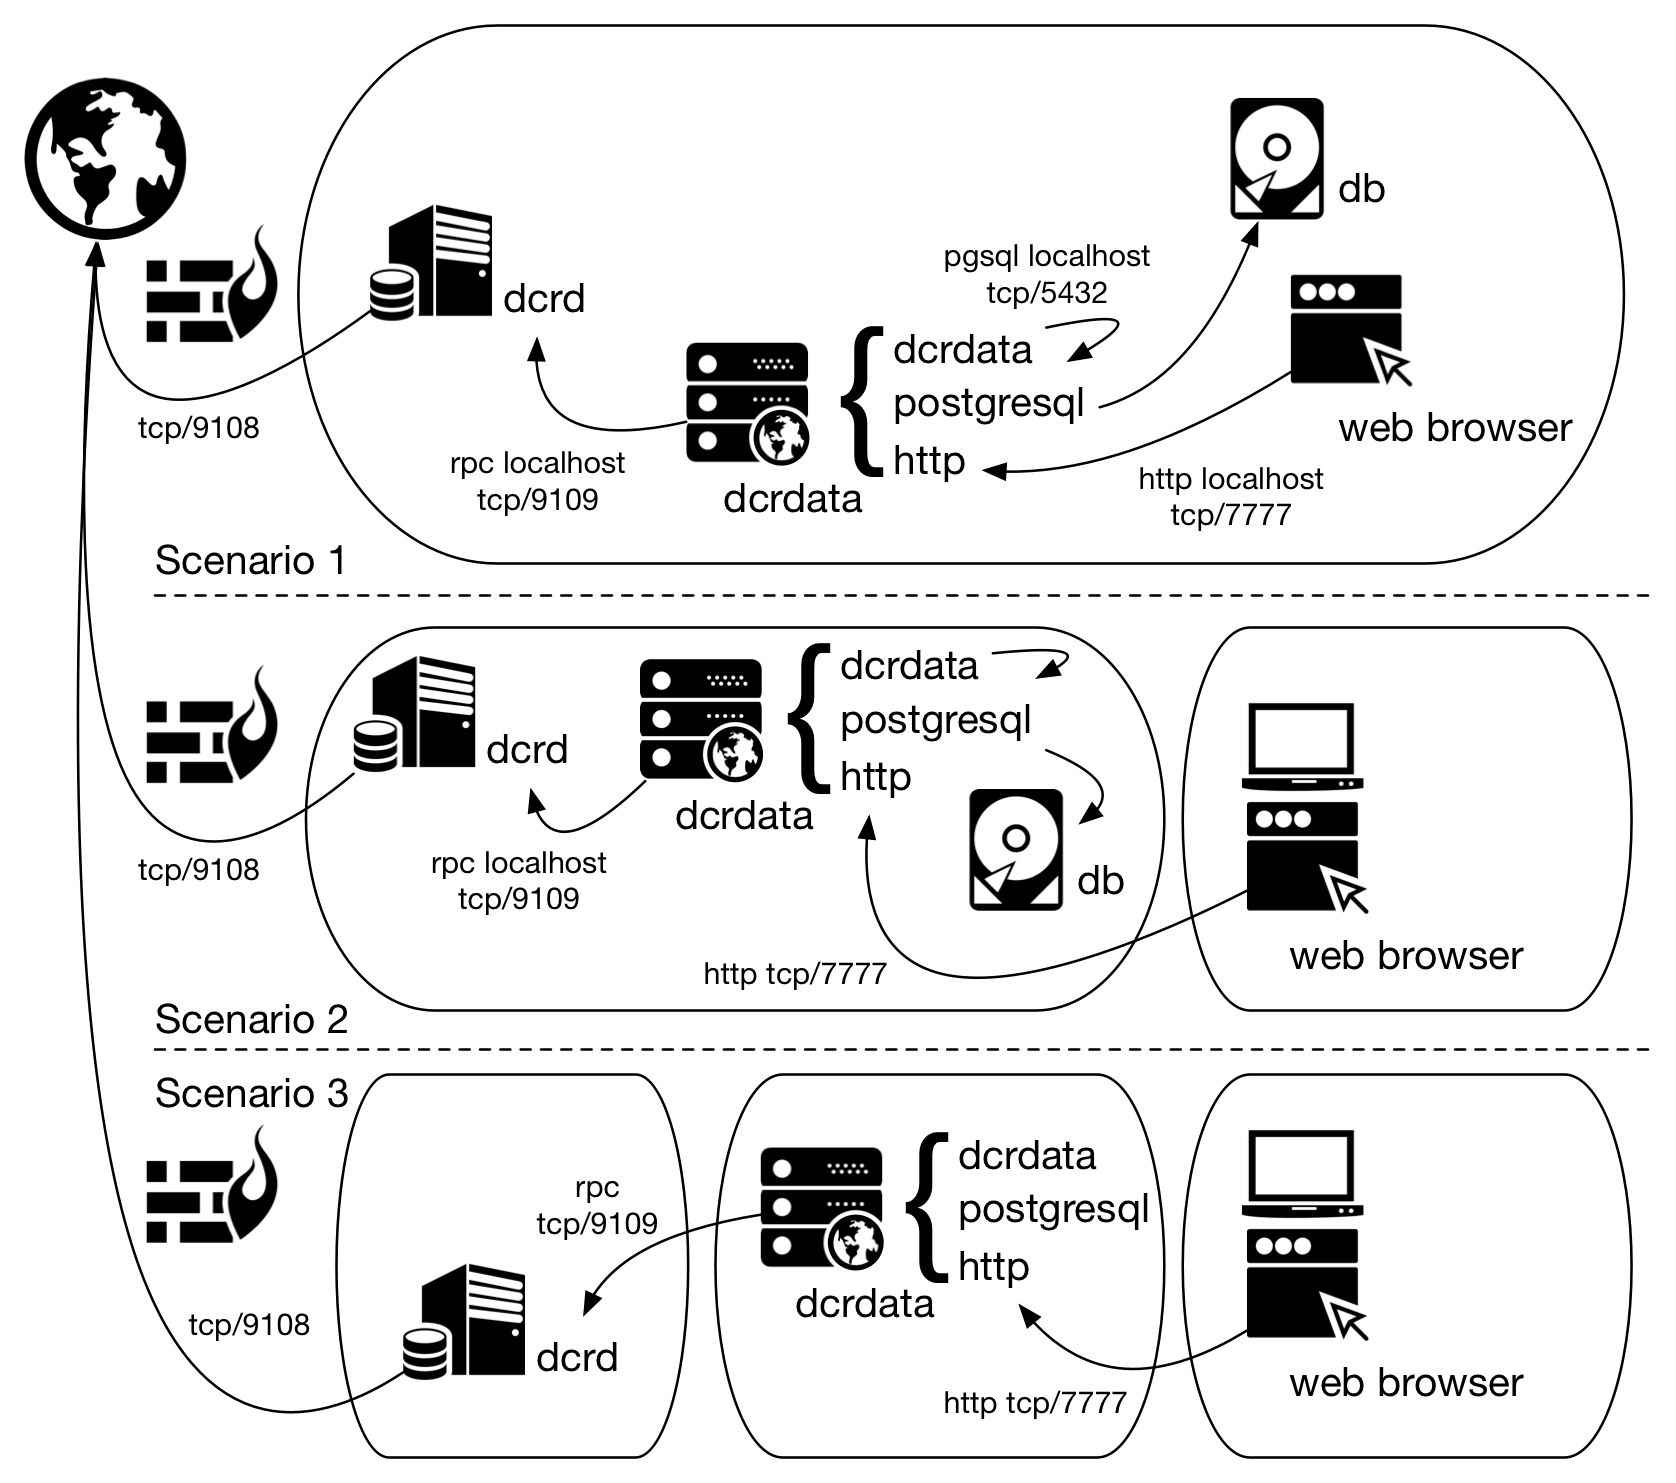
Figure 1 - Possible scenarios for dcrdata installation
3. Installation
The following steps were performed on a Ubuntu 18.04 64-bit for the installation of dcrdata 5.2.0, with dcrd 1.5.1, PostgreSQL 12 and nginx 1.14 (a mix between scenarios 2 and 4, show later).
Hardware Prerequisites
dcrdata only (PostgreSQL in another server):
Minimum configuration:
- 1 CPU core
- 2 GB RAM
- HDD with 4 GB free space
dcrdata and PostgreSQL on the same server (Scenarios 1, 2, 3):
Minimum configuration (works, but very slowly):
- 2 CPU core
- 6 GB RAM
- HDD with 80 GB free space
Recommended configuration:
- 2+ CPU cores
- 8+ GB RAM
- SSD with 80 GB free space
There must be enough space on the partition where the PostgreSQL data directory is located (default: /var/lib/postgresql). Choose a partition or disk that has at least 80 GB free (for 430,000 blocks) plus space for growth.
Software Prerequisites
Golang
To run dcrdata 5.2.0, Go 1.12.12+ or 1.13.3+ must be installed. To install, read article Installing Go (golang).
Check if Go path is in PATH:
$ echo $PATH
If not, add it using the command (assuming the installation path in Installing Go (golang), which shows how to make this configuration permanent):
$ export PATH=$PATH:/usr/local/go/bin
Check if the correct Go is used:
$ which go
$ go version
dcrd
It is necessary to have access to dcrd (>= 1.5.0) synchronized with the best current block in the network. To install, read article Installing dcrd. Scenarios 1 and 2 assume that dcrd and dcrdata are on the same server and this is the default setting for dcrdata.conf. To execute according to scenario 3, it will be necessary to point in the dcrdata.conf the IP address of the dcrd server.
Dcrd must be configured with the following parameters in dcrd.conf (the article Installing dcrd already assumes this configuration):
txindex=1
addrindex=1
Or be executed using the following command in the directory where the executable is located:
$ ./dcrd --txindex --addrindex
To set up dcrd as a Linux service or to learn more about the process, read dcrd as a Linux service.
Node.js
Node.js 12.x or 13.x is only necessary for compiling the ‘Static Web Assets’, and will not be executed afterwards. The commands will be executed inside the dcrdata source directory, shown in installation steps.
PostgreSQL
PostgreSQL 10.5+ is required. Versions 11.x and 12.x are recommended for performance reasons.
My recommendation is also to use version 12 because it brought me better results. To do this, I first removed version 10 that was already installed:
$ sudo apt-get remove postgresql-10
$ sudo apt-get install postgresql-12
Note: If you are on Ubuntu 18 and apt cannot find PostgreSQL 12 package, you can follow the instructions on article https://www.osradar.com/postgresql-12-ubuntu-18-04/.
Important! PostgreSQL must be correctly configured BEFORE execution of dcrdata for the first time. See the online tool PGTune that generates the parameters that must be configured in the file
/etc/postgresql/12/main/postgresql.conf.
Installation steps
The reference $DCRDATA_DIR can be interpreted as follows:
$HOME/go-work/github.com/decred/dcrdata, as in dcrdata README./opt/decred/dcrdata, following the directory structure set out in the article Installing dcrd- You can also use any directory structure of your choice.
The reference $DCRDATA_USER_DIR refers to the user directory where the configuration file will be located. For example, /home/dcrduser.
a) Clone dcrdata repository:
$ sudo git clone https://github.com/decred/dcrdata $DCRDATA_DIR
If you don’t have git, install it using:
$ sudo apt-get install git
b) Enter the directory that was just created and compile dcrdata:
$ cd $DCRDATA_DIR
$ go build
Webpack, a JavaScript module bundler, is used to compile and package the static assets in the public folder. Node.js’ npm tool is used to install the required Node.js dependencies and build the bundled JavaScript distribution for deployment.
$ sudo apt-get install npm
$ sudo npm install
$ sudo npm run build
c) Create the configuration file from the sample:
$ mkdir -p $DCRDATA_USER_DIR
$ cp sample-dcrdata.conf $DCRDATA_USER_DIR/dcrdata.conf
d) Adjust the parameters dcrduser and dcrdpass with RPC user and password information from dcrd. In dcrd.conf file those parameters go by rpcuser and rpcpass:
e) If dcrd is being executed in another host (Scenario 3), change also parameters dcrdserv and dcrdcert accordingly.
f) If dcrdata will be used as a block explorer for a local network (and not just for the localhost), it will be necessary to configure the web service to listen on a local IP address, using the apilisten parameter. This setting is critical for headless hosts (without a monitor).
apilisten=$LOCAL_IP_ADDRESS
g) Create in PostgreSQL the access credential and the database according to the configuration made in dcrdata.conf. Here, both were given the name “dcrdata”:
pgdbname=dcrdata
pguser=dcrdata
pgpass=
To create the credential and database in PostgreSQL, replace the variables below with the names chosen for the parameters above. Superuser privilege was granted because there was a problem creating indexes (the only role of this server is to be dcrdata, this is the only database here and there is no wallet):
$ sudo su - postgres
$ createuser $PGUSER
$ createdb -O $PGUSER $PGDBNAME
$ psql
postgres=# \password $PGUSER
[Type the password and confirm]

postgres=# \q
Write the password in the pgpass parameter in the dcrdata.conf file.
h) Start dcrdata.
Recommendation: To start as a service read the next section.
$ cd $DCRDATA_DIR
$ ./dcrdata
The dcrdata will need approximately six hours to scan the blocks for transactions (for approximately 430,000 blocks).
When the web application is ready, dcrdata will indicate in the log: ‘DATD: Now serving the explorer and APIs on http://127.0.0.1:7777/’. Access dcrdata through the browser at this address (if you have a local browser):
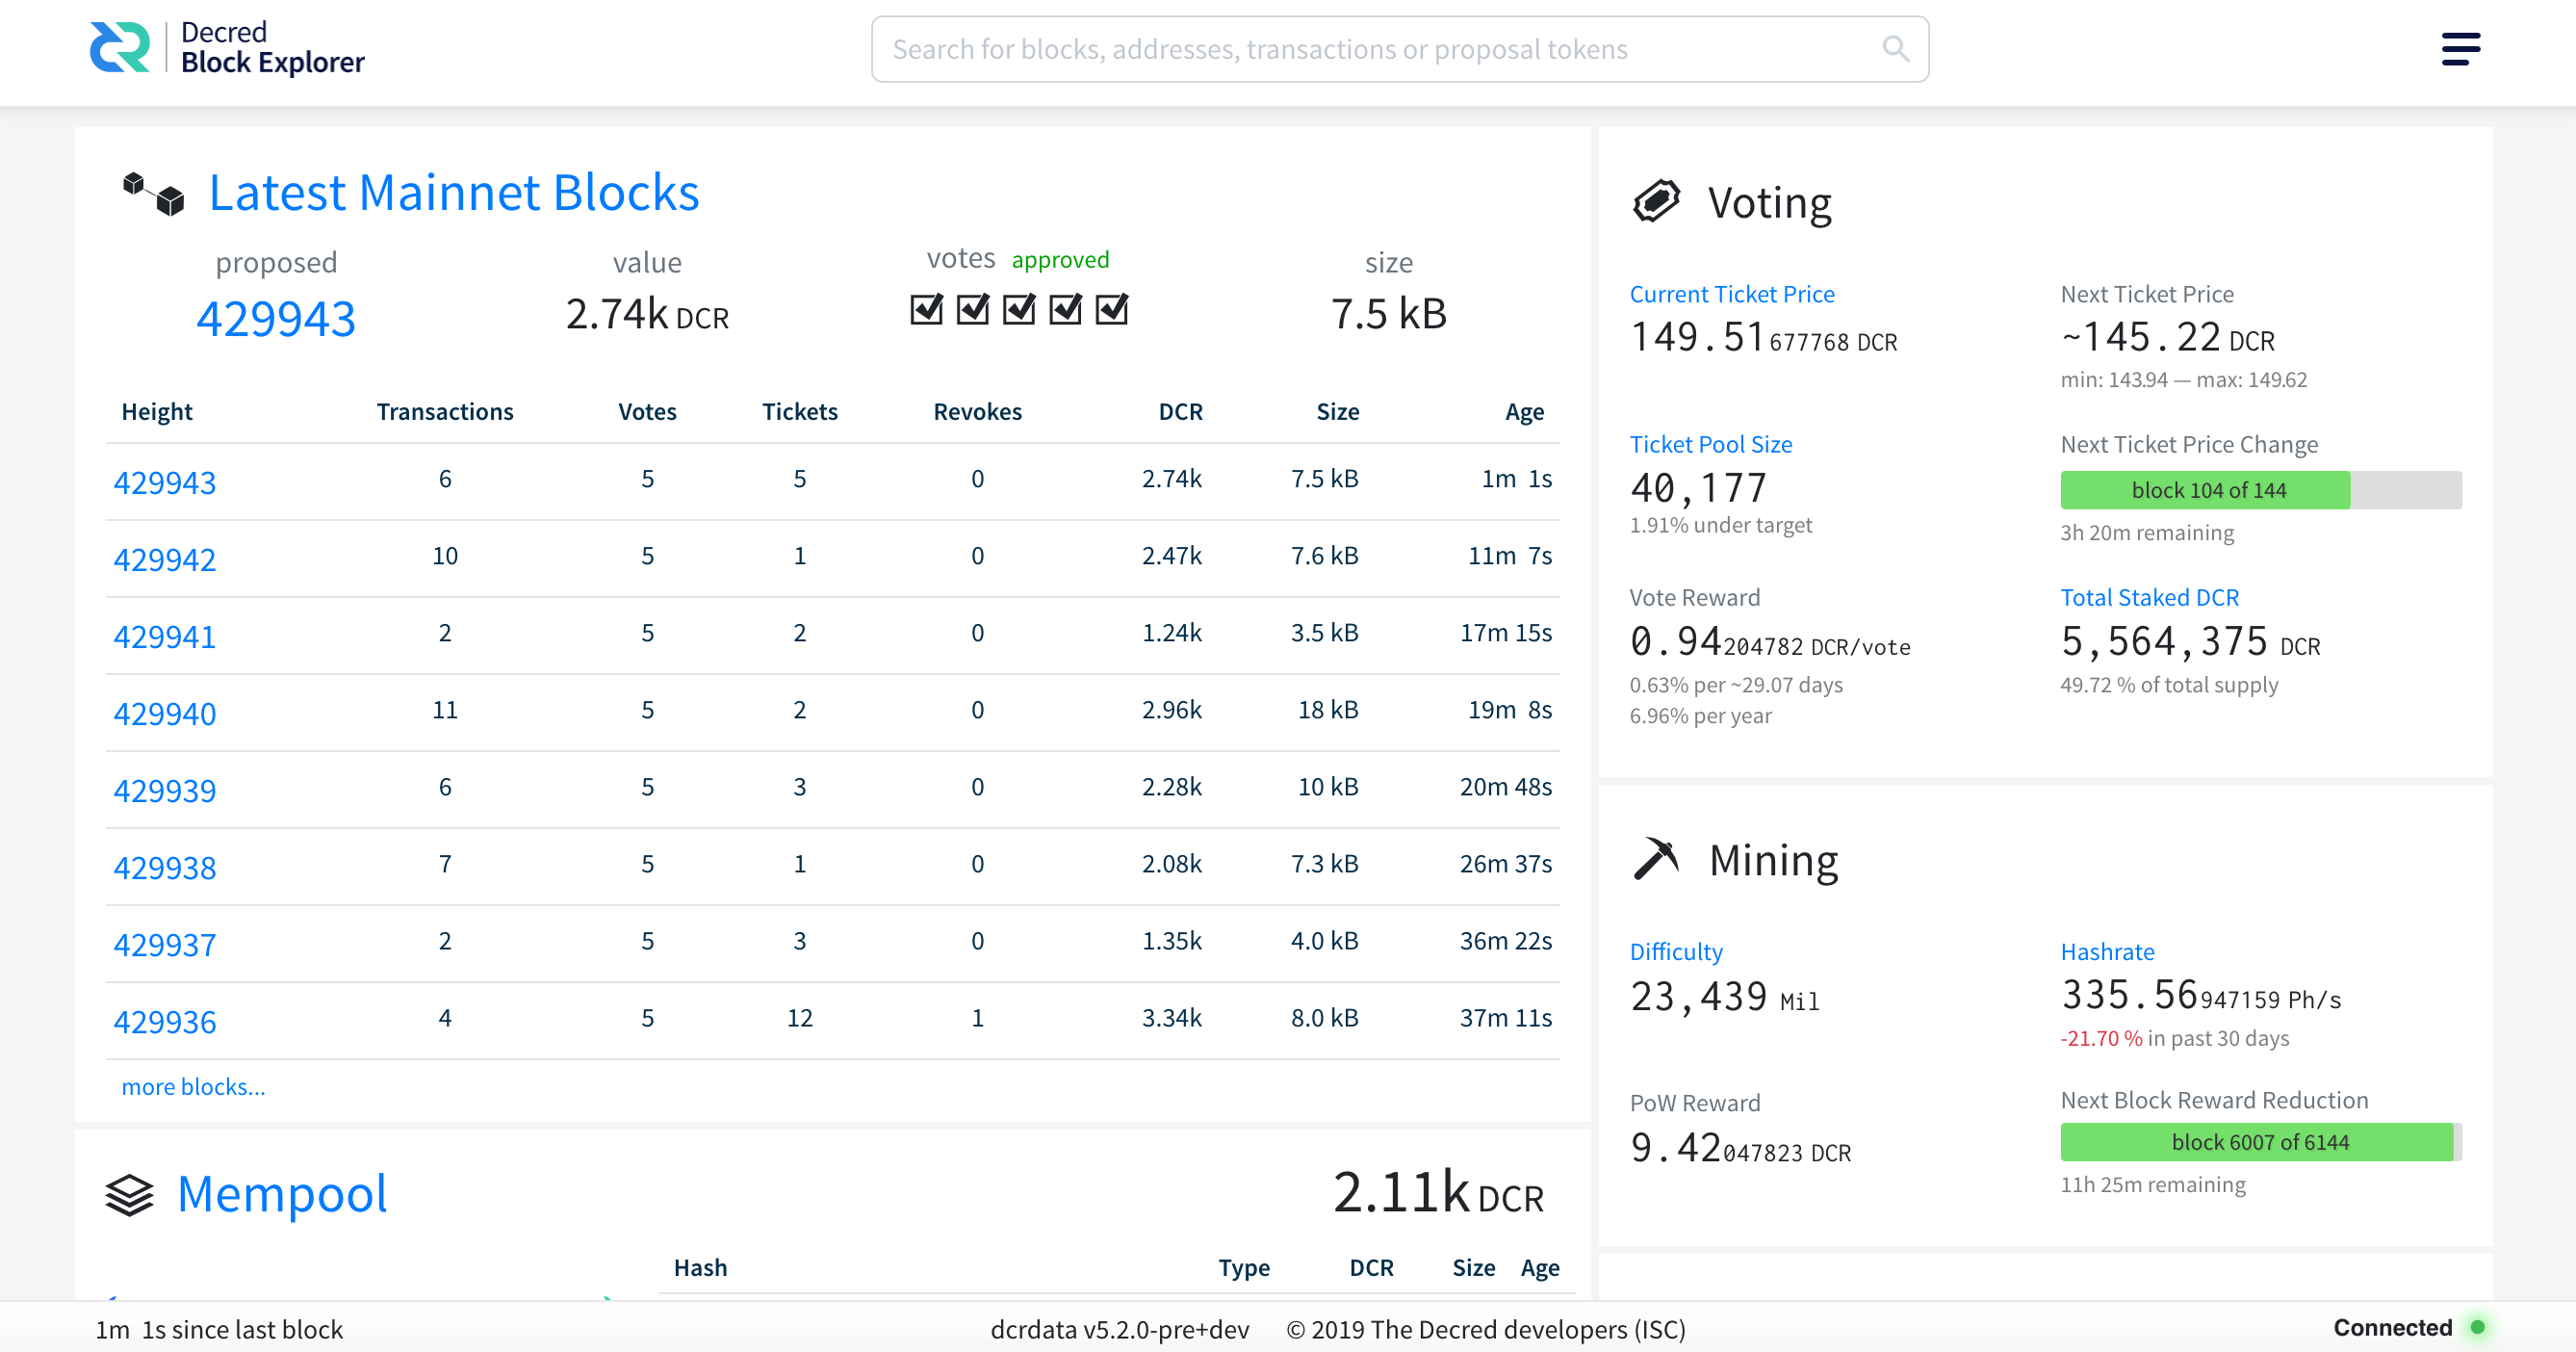
Figure 2 - dcrdata installed and ready to be used
dcrdata as a Linux service
One of the great advantages of configuring both dcrd and dcrdata as Linux services is that the processes will not be interrupted if your session is disconnected.
To set up dcrd as a service or learn more about the process, read dcrd as a Linux service.
# dcrdata termination depends on kill signal.
#
# Author: Marcelo Martins (https://stakey.club)
# dcrdata reference doc:
# https://github.com/decred/dcrdata#getting-started
#
[Unit]
Description=The block explorer of Decred network
Documentation=http://decred.org/
After=network.target dcrd.service postgresql.service

[Service]
Type=simple
WorkingDirectory=/opt/decred/dcrdata
ExecStart=/opt/decred/dcrdata/dcrdata
ExecStop=
TimeoutStopSec=5
KillMode=mixed
Restart=on-abnormal
User=dcrduser
Group=users

[Install]
WantedBy=multi-user.target
[Unit]
After: The units listed in this directive are started before starting this unit. This does not imply a relationship of dependency. If a dependency relationship is required, the Requires directive should be used.
[Service]
WorkingDirectory: It is necessary to inform the installation path of dcrdata. If you installed according to this article, type /opt/decred/dcrdata. If done as in the README, type $HOME/go-work/github.com/decred/dcrdata.
ExecStart: Indicates the full path and arguments of the command that starts the service. If the path is preceded by a “-“, terminations with an exit code other than zero (failure) will be accepted without marking the termination as a failure. Enter the path to your dcrdata installation.
User: With which system user the service should be executed. This parameter can be hidden.
Group: With which system group the service should be executed. This parameter can be hidden.
3.1. Enabling the service
Move the file dcrdata.service to the system folder that contains other service configuration files like this. This step is important so that the next command can find the service file and enable it.
$ sudo mv dcrdata.service /etc/systemd/system/
$ sudo systemctl enable dcrdata.service
Created symlink /etc/systemd/system/multi-user.target.wants/dcrdata.service → /etc/systemd/system/dcrdata.service.
Whenever the system is restarted, the dcrdata service will be required to start up in ‘multi-user’ mode (WantedBy) after starting the ‘After’, network and dcrd services, if installed on this server, and will be started (ExecStart) with user (User) and group (Group) powers if these parameters are specified.
Execution
After the service is enabled through systemctl, it is already possible to check its status:
$ sudo systemctl status dcrdata.service
● dcrdata.service - The block explorer of Decred network
   Loaded: loaded (/etc/systemd/system/dcrdata.service; enabled; vendor preset: enabled)
   Active: inactive (dead)
     Docs: http://decred.org/
To start the service and check its status change, the one that appears on the line ‘Active: active (running)’:
$ sudo systemctl start dcrdata.service
$ sudo systemctl status dcrdata.service
● dcrdata.service - The block explorer of Decred network
   Loaded: loaded (/etc/systemd/system/dcrdata.service; enabled; vendor preset: enabled)
   Active: active (running) since Mon 2020-03-02 00:49:00 UTC; 3s ago
     Docs: http://decred.org/
 Main PID: 2912 (dcrdata)
    Tasks: 14 (limit: 4915)
   CGroup: /system.slice/dcrdata.service
           ├─2912 /opt/decred/dcrdata/dcrdata
           ├─2940 git clone https://github.com/decred-proposals/mainnet.git prop-repo
           ├─2941 /usr/lib/git-core/git-remote-https origin https://github.com/decred-proposals/mainnet.git
           ├─2943 /usr/lib/git-core/git fetch-pack --stateless-rpc --stdin --lock-pack --thin --check-self-contained-and-connected --cloning --no-progress https://github.com/de
           └─2945 /usr/lib/git-core/git index-pack --stdin --fix-thin --keep=fetch-pack 2943 on ip-172-31-9-82 --check-self-contained-and-connected --pack_header=2,118865

Mar 02 00:49:00 ip-172-31-9-82 dcrdata[2912]: 2020-03-02 00:49:00.607 [INF] DATD: Connected to dcrd (JSON-RPC API v6.1.1) on MainNet
Mar 02 00:49:00 ip-172-31-9-82 dcrdata[2912]: 2020-03-02 00:49:00.607 [INF] SKDB: Loading ticket pool DB. This may take a minute...
Mar 02 00:49:00 ip-172-31-9-82 dcrdata[2912]: 2020-03-02 00:49:00.648 [INF] SKDB: badger: All 0 tables opened in 0s
Mar 02 00:49:00 ip-172-31-9-82 dcrdata[2912]: 2020-03-02 00:49:00.660 [INF] SKDB: Loading all ticket pool diffs...
Mar 02 00:49:00 ip-172-31-9-82 dcrdata[2912]: 2020-03-02 00:49:00.660 [INF] SKDB: Successfully loaded 0 ticket pool diffs
Mar 02 00:49:00 ip-172-31-9-82 dcrdata[2912]: 2020-03-02 00:49:00.660 [INF] SKDB: Creating new stake DB.
Mar 02 00:49:00 ip-172-31-9-82 dcrdata[2912]: 2020-03-02 00:49:00.683 [INF] SKDB: Advancing ticket pool DB to tip via diffs...
Mar 02 00:49:00 ip-172-31-9-82 dcrdata[2912]: 2020-03-02 00:49:00.683 [INF] SKDB: Pre-populating live ticket cache and computing pool value...
Mar 02 00:49:00 ip-172-31-9-82 dcrdata[2912]: 2020-03-02 00:49:00.683 [INF] DATD: Loaded StakeDatabase at height 0
Mar 02 00:49:00 ip-172-31-9-82 dcrdata[2912]: 2020-03-02 00:49:00.683 [INF] DATD: Setting up the Politeia's proposals clone repository. Please wait...
lines 1-18/18 (END)
To monitor the status of the services as it would be done when running directly on the terminal, start new terminals and make an SSH connection on each one to the server (assuming that dcrd and dcrdata are running on the same server). In each one, type the commands below, according to your directory structure:
$ tail -f /home/dcrduser/.dcrd/logs/mainnet/dcrd.log
$ tail -f /home/dcrduser/.dcrdata/logs/mainnet/dcrdata.log
$ tail -f /var/log/postgresql/postgresql-12-main.log
3.2. Accessing via HTTPS
Now that everything is running as expected, it is possible to make one last change: configure HTTPS access for the block explorer. Access via HTTPS aims to prevent the local network from being able to capture the transaction and wallet addresses that a user searches for, which can lead to the discovery of their purchases, tickets or balance, by inference or correlation. If dcrdata is being accessed via a browser from localhost, configuring HTTPS access will make no difference.
The dcrdata README suggests that this access be done via the nginx reverse proxy as shown in the following figure, except for the separation in three different devices:
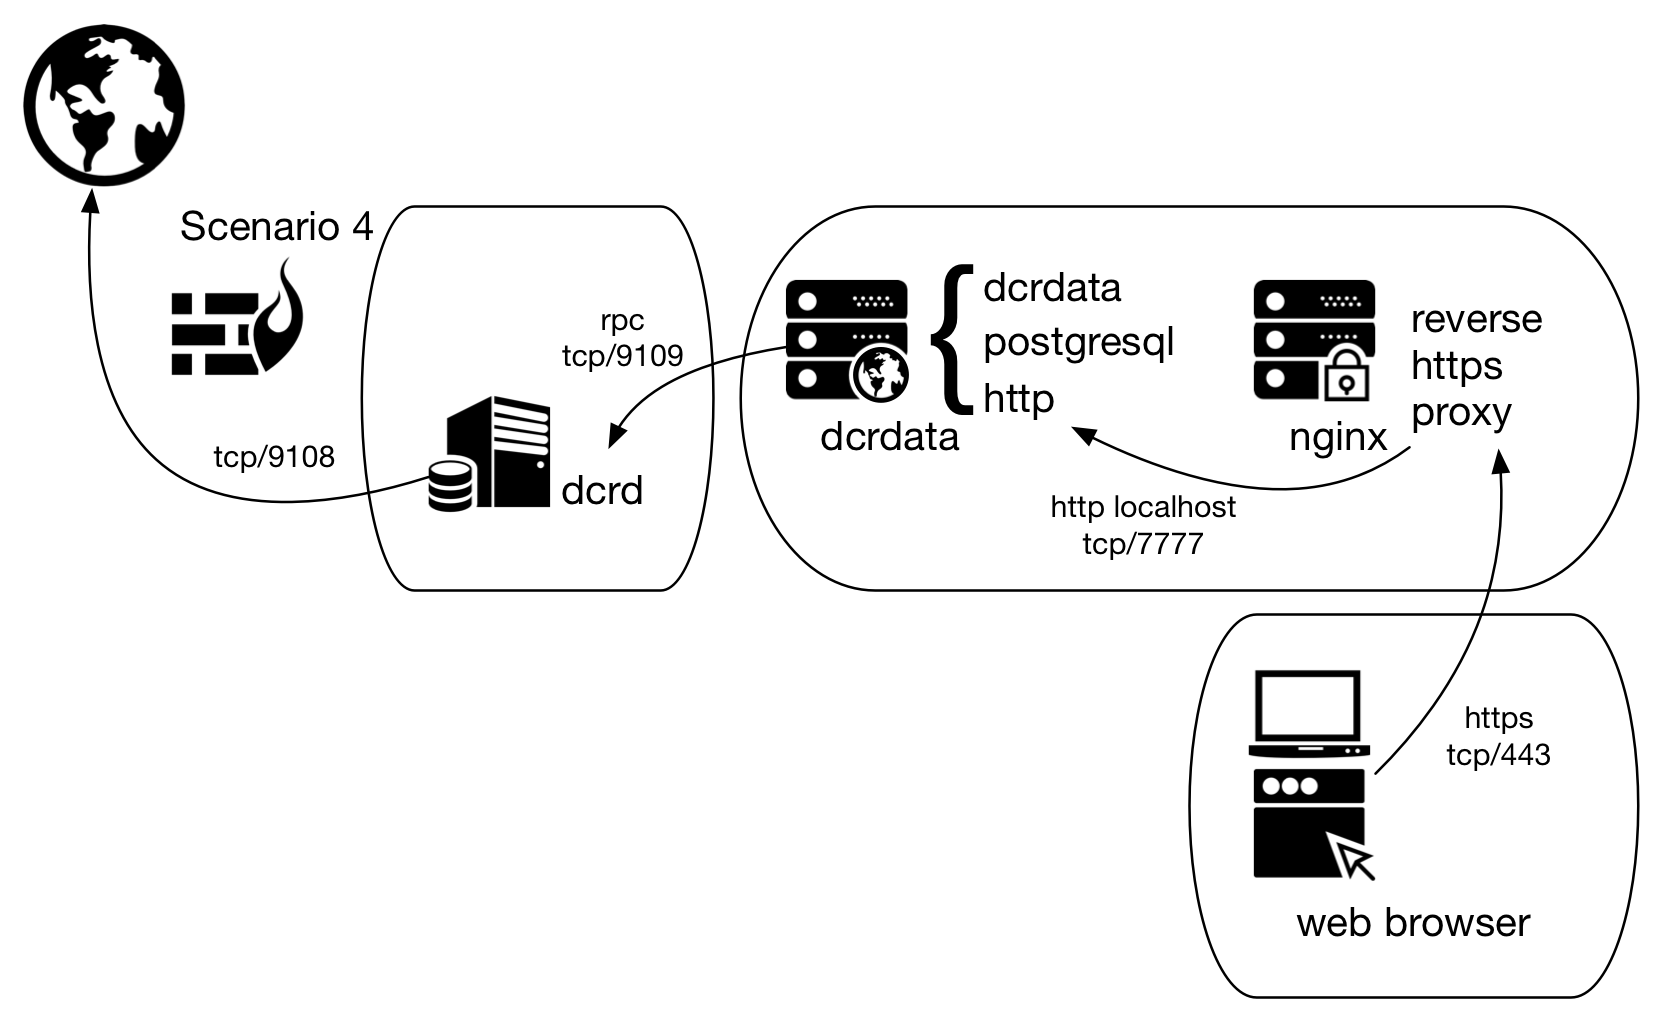
Figure 3 - Scenario 4 of dcrdata use, now via nginx
The sample-nginx.conf file in the main dcrdata directory is already pre-configured for the application running at http://127.0.0.1:7777/. What is missing is a configuration adjustment and digital certificate to encrypt the connection between nginx and the client’s browser. The instructions below assume the scenario in Figure 3, except for the separation between the devices.
The first step is to install nginx:
$ sudo apt install nginx
Second, copy the sample-nginx.conf file to /etc/nginx/nginx.conf and edit the file to include the correct certificate and private key paths:
$ sudo mv /etc/nginx/nginx.conf /etc/nginx/nginx.conf.old
$ sudo cp sample-nginx.conf /etc/nginx/nginx.conf
The instructions below show how to create an X.509 certificate for use with nginx. Keep in mind that you will be harassed by Google Chrome, which will not accept the self-signed certificate in the next section without a good fight. Prefer the use of Let’s Encrypt certificate, shown in the following section.
OpenSSL self-signed certificate
Because a self-signed certificate is a certificate like any other except for the trust relationship, we will generate a self-signed certificate for dcrdata to encrypt the communication.
a) Create the directory, certificate and private key and configure directory permissions:
$ sudo mkdir -p /etc/ssl/dcrdata
$ sudo openssl req -new -x509 -days 365 -nodes -out /etc/ssl/dcrdata/dcrdata-cert.pem -keyout /etc/ssl/dcrdata/dcrdata-key.key
$ sudo chmod -R 600 /etc/ssl/dcrdata
b) In the nginx.conf file, change the ssl_certificate and ssl_certificate_key parameters so that they point to the certificate and key generated in the first step:
ssl_certificate       /etc/ssl/dcrdata/dcrdata-cert.pem
ssl_certificate_key   /etc/ssl/dcrdata/dcrdata-key.key
c) Remove previous versions of TLS and leave only the current one, 1.2. Use only secure cryptographic methods, which will prevent access from outdated devices.
ssl_protocols         TLSv1.2;
ssl_ciphers           ECDHE-ECDSA-AES256-GCM-SHA384:ECDHE-RSA-AES256-GCM-SHA384:ECDHE-ECDSA-CHACHA20-POLY1305:ECDHE-RSA-CHACHA20-POLY1305:ECDHE-ECDSA-AES128-GCM-SHA256:ECDHE-RSA-AES128-GCM-SHA256:ECDHE-ECDSA-AES256-SHA384:ECDHE-RSA-AES256-SHA384:ECDHE-ECDSA-AES128-SHA256:ECDHE-RSA-AES128-SHA256;
d) Restart nginx service:
$ sudo service nginx restart
e) Access the address https://127.0.0.1/. The browser will warn you that the certificate is not part of a chain of trust.
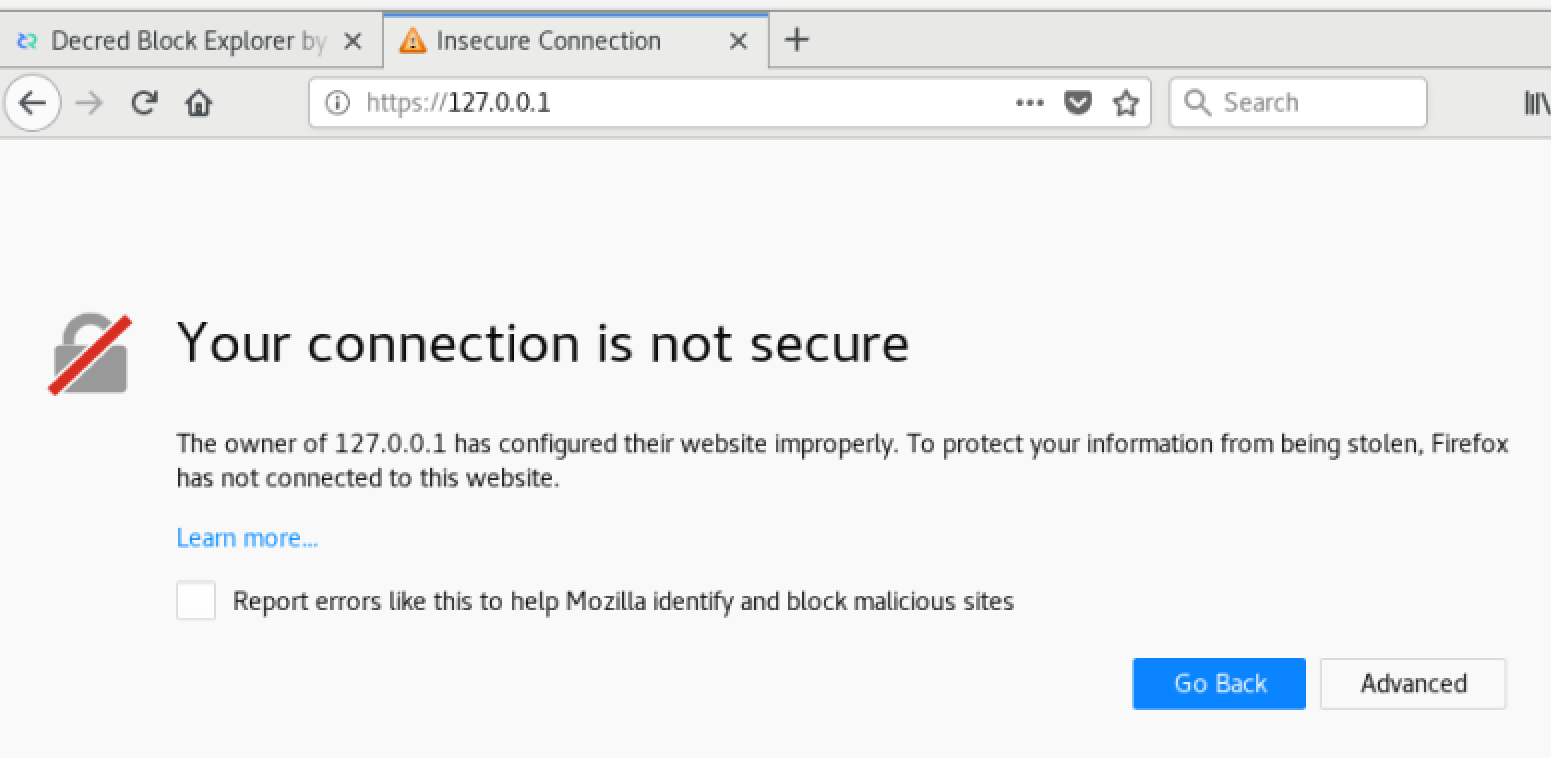
Figure 4 - Firefox Security Exception
f) Create a permanent exception and reload the page. The alert will remain shown in the address bar.
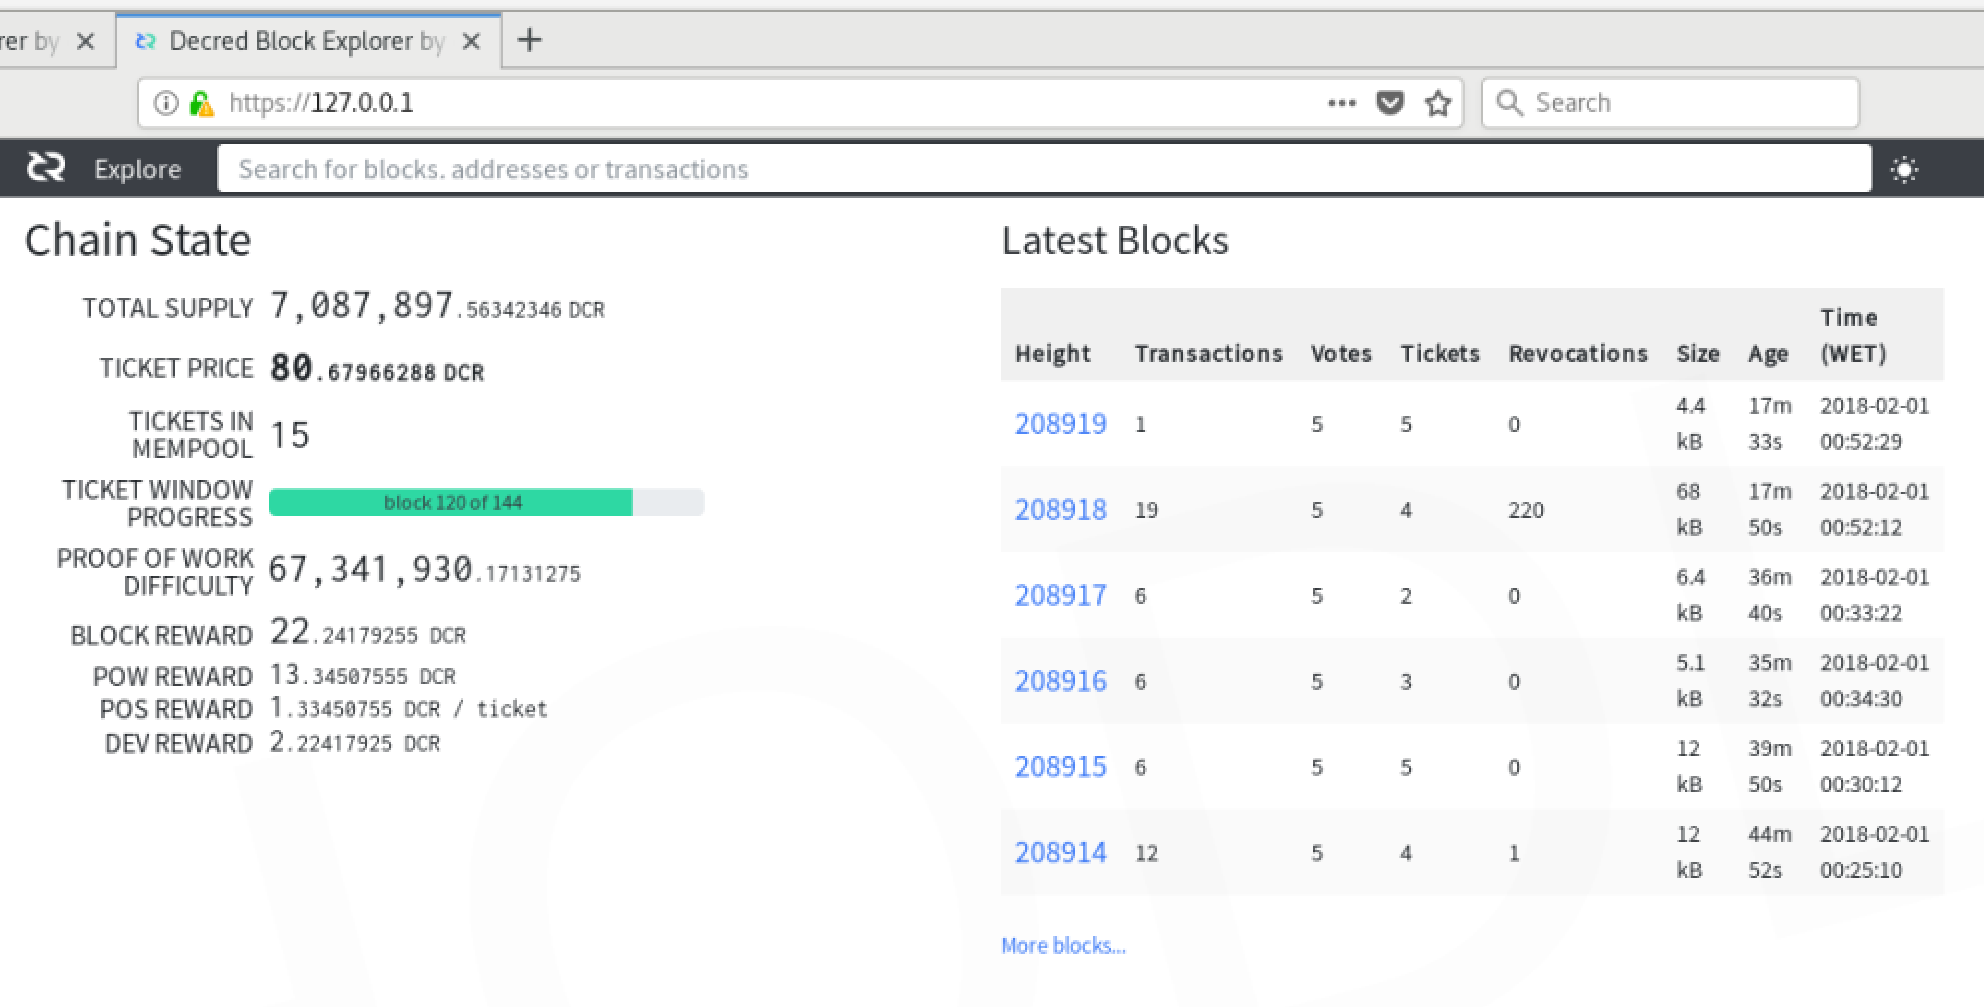
Figure 5 - dcrdata accessed via https
Let’s Encrypt certificate
For this distribution and version of the operating system, the steps presented here were followed.
In summary, add the Certbot repository, update the package list, install certbot:
$ sudo apt-get update
$ sudo apt-get install software-properties-common
$ sudo add-apt-repository universe
$ sudo add-apt-repository ppa:certbot/certbot
$ sudo apt-get update

$ sudo apt-get install certbot python-certbot-nginx
3.3. Accessing HTTPS via Tor
In addition to the end-to-end encryption configured in the previous section, we can also encapsulate HTTPS access via Tor, at least at the endpoint of the dcrdata server.
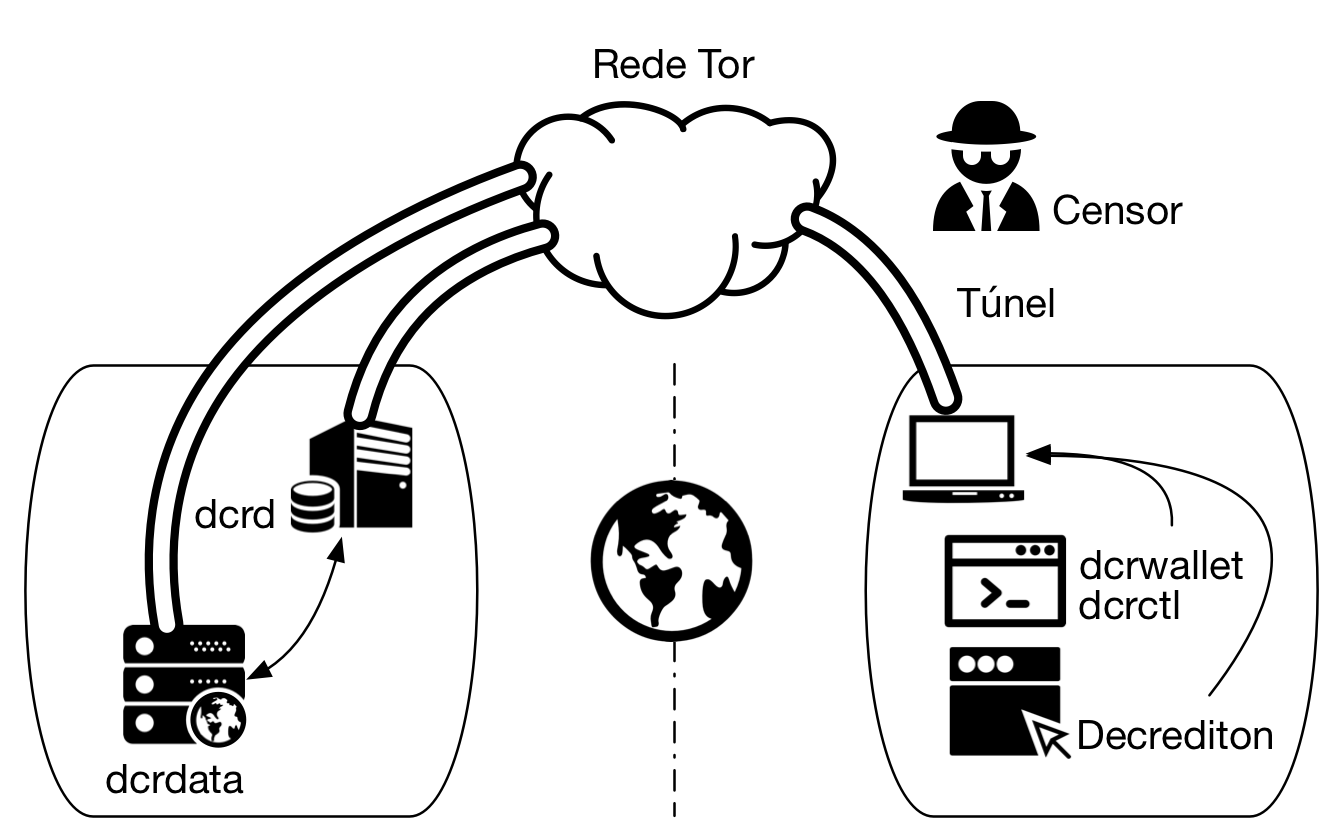
Figure 6 - dcrdata accessed via https via Tor
nginx configuration
Change the listen parameter in the server section:
    server {
        listen       443 default_server;
        server_name  _;
to:
    server {
        listen       127.0.0.1:9070 default_server;
        server_name _;
Tor configuration
To install the Onion Service, it will be necessary to edit torrc file.
a) Search for the file Browser/TorBrowser/Data/Tor/torrc in Tor Browser directory.
b) Open torrc file and search for line: ### This section is just for location-hidden services ###
c) Add the following lines next to it in torrc file:
HiddenServiceDir /var/tor/dcrdata
HiddenServicePort 443 127.0.0.1:9070
d) Reload Tor configuration:
$ sudo service tor reload
In the specified directory in HiddenServiceDir, the files hostname and private_key will be created, containing the .onion hostname and the private key, respectively.
hostname
The hostname file is created by Tor and contains the name with which the service advertises itself on the Tor network, which is a short version of the public key and looks like duskgytldkxiuqc6.onion. This is the public name of your service and will be used to access dcrdata.
private_key
Another file created in the same directory is private_key. Keep it safe. It contains the private key generated for this onion service and if it falls into the wrong hands it will allow third parties to impersonate the service on the Tor network.
e) Restart nginx:
$ sudo service nginx restart
To learn more, read Decred through Tor network.
4. Update
Terminate dcrdata process using [Ctrl+C] in the terminal where it is being executed or terminate the process using kill command:
$ kill `ps ax | grep ./dcrdata | head -1 | cut -d' ' -f2`
To update dcrdata, run:
$ cd $DCRDATA_DIR
$ git pull origin master
$ go build
Execute dcrdata again:
$ ./dcrdata
At the end, access the web address again (if it is local it will be https://127.0.0.1/) and check that dcrdata is running as expected.
5. Troubleshooting
Been there, done that.
Common issues
- Lack of memory: It will interrupt the execution of the process and should cause a ‘crash’ in the database. It usually occurs with less than 6 GB of RAM.
- Lack of disk space: When the disk space runs out, the dcrdata process will be interrupted and this should cause a ‘crash’ in the database. You can try to recover via
rebuilddb2, but don’t get your hopes up. - dcrdata stops after “[INF] PSQL: DB schema version 1.7.0”
Rebuilddb2
rebuilddb2 script is the application that creates and performs maintenance on the PostgreSQL database.
$DCRDATA_DIR will be $HOME/go-work/github.com/dcrdata/dcrdata if you followed the README or /opt/decred/dcrdata if you followed this article.
a) Enter the $DCRDATA_DIR/cmd/rebuilddb2/ directory and create the configuration file based on the sample:
$ cd $DCRDATA_DIR/cmd/rebuilddb2
$ cp sample-rebuilddb2.conf rebuilddb2.conf
b) Edit the RPC connection parameters (dcrduser, dcrdpass, dcrdserv and dcrdcert) and PostgreSQL (dbname, dbuser and dbpass) with the same values as dcrdata.conf.
c) Change in rebuilddb2.conf file the nodaemontls parameter that contains value true. Rebuilddb2 default setting is to start an RPC client and try to connect to dcrd without encryption. The dcrd will refuse the connection stating that the client does not appear to be attempting a TLS handshake. In the rebuilddb2 terminal there will be a fatal error because of malformed HTTP response.
nodaemontls=false
d) Compile rebuilddb2:
$ go build
e) If dcrd already has all the blocks copied locally, run rebuilddb2, which will create the tables in PostgreSQL. If the dcrd is still being updated, the RPC connection will be refused.
$ ./rebuilddb2
From scratch
To start over without having to rebuild the entire server, let’s delete the database and the files generated by dcrdata.
a) Stop the execution of dcrdata, if applicable:
$ kill `ps ax | grep ./dcrdata | head -1 | cut -d' ' -f2`
b) Delete BoltDB files:
$ rm -rf /home/dcrduser/data/mainnet/
c) Assuming that the database is named ‘dcrdata’, exclude it from PostgreSQL server:
$ sudo su - postgres
$ dropdb dcrdata
$ createdb -O $pguser $pgdbname
$ exit
6. Backup and Restore
dcrd and dcrdata
a) Backup ~/.dcrd and ~/.dcrdata folders.
b) Backup /etc/systemd/system/dcrd.service and drcdata.service
PostgreSQL
a) Backup /etc/postgresql/12/main/postgresql.conf file after tuning the config (PGTune).
b) Read PostgreSQL man pages for SQL Dump to learn how to dump and restore the database.
